
In the Part 1 of this tutorial we fussy cut all the squares – the larger 3.5×3.5 in and the smaller ones at 1.5×1.5 in. Then we boxed the smaller squares with the background fabric, in this case white, and we ended up with 49 squares that need to be assembled in the quilt top.
To speed up the process, and at the same time not loose track of which squares go where, I chain stitched 2 by 2 columns – all you do is pick up the squares of the columns you are working on in two piles – making sure you keep the order and then you stitch two and two together without breaking thread, like so…
Order in which you sew these columns is up to you. The following two pictures show what I had done – in the first pass I stitched columns 1 and 2, 3 and 4, 5 and 6; which left me with 4 “new” columns. So in the second pass I sewed together blocks in columns 1 and 2 and then 3 and 4, and so on.
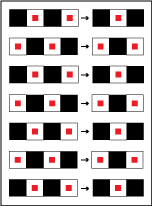
Or if you prefer an illustration…
Almost done. Each row is separated with a 1 in strip, so you need to cut 6 strips 1.5 in wide and as long as the width of your rows + 1 in. Why + 1 in… I just prefer to have a little extra that I can cut off , than to have to cut another strip; also I am not a very accurate cutter so I like to have a bit of a buffer to work with. For this particular example – 7 blocks 3 in in width finished size, plus two raw edges at each side of a row, makes 21.5 in. I cut strips around 22.5 in.
Once you have your strips all you have to do is sew them in between the rows. The tricky part here (not that tricky but something to think about) is to align the squares vertically across the strips. That’s it. Once you have all the rows connected simply cut off the excess).

The very last step is – the border. I cut the strips 4 in wide. That will give me about 3 in wide border once the binding is on. That’s it. All you have to do then is sandwich and quilt it. Done!

If you are looking for the Part 1 of this tutorial you can find it here.

2 thoughts on “klar quilt tutorial: part 2”